WLAN Configurations for Meridian Follow
Introduction
The most effective strategy for configuring the Meridian IoT profile is to do it at the cluster node. Configuring the radio profile, beacons management iot profile, asset tracking iot profile, and adding the DigiCert Root Certificate to the cluster node ensures that the desired MDs and APs are configured properly to communicate to Meridian servers. Configuring the profiles at the cluster level eliminates the potential conflict with inherited policies from a different source. The APs will report the beacons and tags it observes to the MD, from there, the MD tunnels and sends the data onward to Meridian servers. Hence, it is critical that the cluster is configured with the correct profiles.
Goal
To create the required IoT profiles for Meridian Beacons Management and Asset Tracking. This example covers enabling the internal BLE radios of the APs in in the AP Groups APG1, APG2 and APG3 and configure them for Meridian Beacons Management and Asset Tracking.
Process
- Enable the Internal BLE Radio in the APs
- Configure IoT profile for Beacons Management
- Configure IoT profile for Asset Tracking
Deployment Topology
For the purpose of this exercise, we will be looking at the Mobility Conductor (MC) / Managed Device (MD) deployment model as shown below to provide an understanding of where the Meridian IoT profiles should be configured.
This sample campus infrastructure includes the MC, MD, cluster, and AP groups.
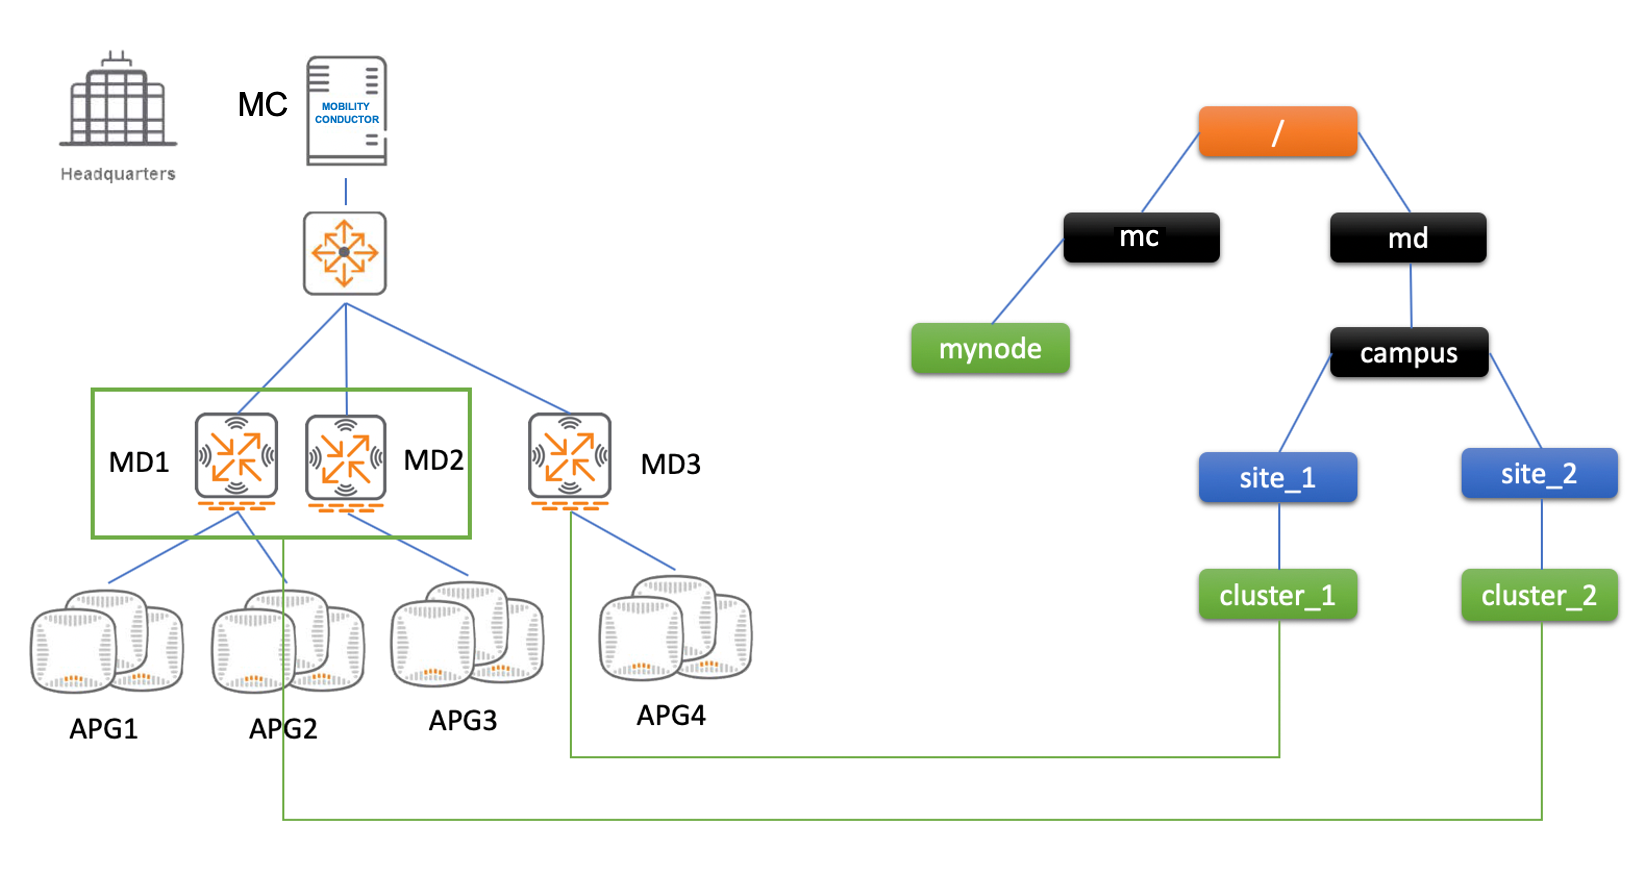
In the CLI, the hierarchy will have the following structure:
/
/md
/md/campus/cluster_1
/md/campus/cluster_2
/mm
/mynode
Procedure
Step 1. Navigating the the Proper Node In the Hierarchy
In a Mobility Conductor (MC) / Managed Device (MD) deployment model, the configurations must be done from the MC. On the MC, change the working directory to the target node in the hierarchy. In this example the target node is cluster_2, which includes MD1 and MD2, where the APs that will be used for Beacons Management and Asset Tracking are grouped into APG1, APG2 and APG3. Since the configurations have to get properly written to the APs, configuring at the cluster_2 node will ensure MD1 and MD2 inherit the proper configuration settings.
(mynode) (config) cd /md/campus/cluster_2
Step 2. Enabling the Internal AP BLE Radio
Enabling the internal AP BLE radio is a crucial step because the internal BLE must be broadcasting its Beacon ID so it can be configured to operate as a beacon and a beacon sensor.
(mynode) [cluster_2] (config) #iot radio-profile internal-ble
(mynode) [cluster_2] (IoT Radio Profile "internal-ble" #radio-mode ble
(mynode) [cluster_2] (IoT Radio Profile "internal-ble" #exit
(mynode) [cluster_2] (config) #write memory
Step 3. Configuring the Beacons Management IoT Profile.
This is required for both Beacons Management and Asset Tracking because this configuration will send beacon and tag device information, such as mac address, firmware version, battery level, etc , to the Beacons Management server.
(mynode) [cluster_2] (config) #iot transportProfile beacons-mngnt
(mynode) [cluster_2] (IoT Data Profile "beacons-mngnt") #serverType Meridian-Beacon-Management
(mynode) [cluster_2] (IoT Data Profile "beacons-mngnt") #serverURL https://edit.meridianapps.com/api/beacons/manage
(mynode) [cluster_2] (IoT Data Profile "beacons-mngnt") #accessToken <access token>
(mynode) [cluster_2] (IoT Data Profile "Bbeacons-mngnt") #reportingInterval 600
(mynode) [cluster_2] (IoT Data Profile "beacons-mngnt") #include-ap-group APG1
(mynode) [cluster_2] (IoT Data Profile "beacons-mngnt") #include-ap-group APG2
(mynode) [cluster_2] (IoT Data Profile "beacons-mngnt") #include-ap-group APG3
(mynode) [cluster_2] (IoT Data Profile "beacons-mngnt") #exit
(mynode) [cluster_2] (config) #iot useTransportProfile "Bbeacons-mngnt"
(mynode) [cluster_2] (config) #write memory
Step 4. Configuring the Asset Tracking IoT Profile.
Step 4.1. Install the DigiCert Root Certificate.
Before starting on the configurations for asset tracking, you'll need to add the DigiCert Root Certificate to the controllers in the node. A rootCA certificate is required on the controller when connecting the the tags server. This is only required for Asset Tracking because asset tracking tunnels to Meridian using WebSocket Secure (wss) protocol.
Step 4.2. Configure the Asset Tracking IoT Profile
(mynode) [cluster_2] config) #iot transportProfile asset-tracking
(mynode) [cluster_2] (IoT Data Profile "asset-tracking") #serverType Meridian-Asset-Tracking
(mynode) [cluster_2] (IoT Data Profile "asset-tracking") #serverURL https://tags.meridianapps.com/api/v1beta1/streams/ingestion.start
(mynode) [cluster_2] IoT Data Profile "asset-tracking") #accessToken <access token>
(mynode) [cluster_2] (IoT Data Profile "asset-tracking") #clientID <location id>
(mynode) [cluster_2] (IoT Data Profile "asset-tracking") #reportingInterval 5
(mynode) [cluster_2] (IoT Data Profile "asset-tracking") #include-ap-group APG1
(mynode) [cluster_2] (IoT Data Profile "asset-tracking") #include-ap-group APG2
(mynode) [cluster_2] (IoT Data Profile "asset-tracking") #include-ap-group APG3
(mynode) [cluster_2] (IoT Data Profile "asset-tracking") #exit
(mynode) [cluster_2] (config) #iot useTransportProfile asset-tracking
(mynode) [cluster_2] (config) #write memory
Summary
Configuring the iot proiles at the proper level in your WLAN will ensure proper communication to Meridian servers and make it easier to troubleshoot if something doesn't work as expected. The beacons management iot profile is required for both beacons management and asset tracking because it reports beacon and tag information such as hardware type, battery level, MAC address, uuid/major/minor, rssi, firmware, etc. to Meridian. Whereas asset tracking iot profile only reports tag telemetry data to Meridian, it is only needed for tracking tags.
Comments
0 comments
Please sign in to leave a comment.