AOS 10 Meridian Beacons Management and Asset Tracking Configuration Guide Follow
 Overview
This guide describes the setup and configurations required for supporting Meridian Beacons Management and Asset Tracking on the HPE Aruba Networking Central AOS 10.
Assumptions
This article assumes that -
- The user has admin permissions to configure their infrastructure following HPE Aruba Networking's deployment guide using HPE Aruba Networking Central and Instant Access Points (IAP).
- The user has admin access to an active Meridian Editor account for managing location-based services.
- The required Meridian SKU is activated for beacon management and/or asset tracking.
- The HPE Aruba Networking Access Points (APs) from the following series are being used: AP-30x, AP-31x, AP-36x, AP-37x, AP-5xx, AP-6xx series APs.
- The APs are operated on AOS 10.5.1.0 or a later version for compatibility with Meridian services.
Limitations
- Meridian will only configure 1 internal APB. 2 APB case is not supported for auto deploy
- AP-32x, AP-33x, AP-34x, and AP-387 series APs are not supported as they are parked on AOS version 10.4.x and can't be upgraded to AOS 10.5.1.0 or later
Meridian Editor Components
The following Meridian components are required to complete the configurations for HPE Aruba Networking Central to communicate with Meridian servers for Beacon Management and Asset Tracking.
Access Token
The Access Token serves as a secure means for HPE Aruba Networking Central to establish communication with Meridian servers. You need to generate the access token to get started by following the steps below. This process only requires a one-time execution since the same Access Token can serve for both Beacon Management and Asset Tracking.
If you haven't generated the access token yet, please follow the steps below to create a new access token in the Editor
In your Meridian Editor cloud account, navigate to Beacons > Beacons Management
Click Generate your access token to get started
After the access token is generated, it will be displayed in the ACCESS TOKEN field. You can conveniently copy it by clicking the adjacent copy icon as shown.
Meridian Server URL
Meridian provides both a Standard server for users outside the EU and a dedicated EU server for European Union users. When configuring the Meridian IoT application on the IoT connector in HPE Aruba Networking Central, it's important to ensure you use the correct server URL. The default setting is the Standard Server URL, but you can change it as needed.
To determine the appropriate server URL, simply check the webpage URL you use to access your Meridian Editor account:
- If you access your Meridian account via https://edit.meridianapps.com, you are using the Standard server.
- If you access your Meridian account via https://edit-eu.meridianapps.com, you are on the EU server.
Knowing which instance of the Meridian Server your Meridian Editor account is associated with is crucial for correctly configuring your devices to communicate with the Meridian servers.
Beacons Management Server URL
Standard server: https://edit.meridianapps.com/api/beacons/manage
EU server: https://edit-eu.meridianapps.com/api/beacons/manage
Asset Tracking Server URL
Standard server: https://tags.meridianapps.com/api/v1beta1/streams/ingestion.start
EU server: https://tags-eu.meridianapps.com/api/v1beta1/streams/ingestion.start
Location ID
The Location ID is essential for configuring the Meridian IoT application within HPE Aruba Networking Central's IoT connector. You can obtain it from the Meridian Editor settings page or your account's URL.
Or you can get it from the webpage URL after you log into your Edit account. The syntax for the Meridian Editor URL will look like this:
https://edit.meridianapps.com/apps/<Location ID>
HPE Aruba Networking Central Configurations
Support for enabling the APB and configuring the IoT profiles for Beacon Management and Asset Tracking has been evolving in Central. Please pay close attention to the firmware you are using as it will affect how you configure your infrastructure to work with Meridian.
Enabling the Internal Access Point Beacons
Before you start, the AP Beacons (APB) must be enabled to be provisioned for use with Meridian. If the APB is not enabled, the APB will not be broadcasting the beacon ID and Meridian tools will not be able to configure the beacon for use.
To enable the internal BLE radio in HPE Aruba Networking Central UI, do the following:
Step 1:
Navigate to the Group where you want the BLE configurations enabled, then click on Devices. Click on the Configure icon on the top right-hand corner of the page, then click on Show Advanced.
Step 2:
Navigate to the IoT tab, and scroll down the page to see IoT Radio Profiles. Click + to add a new profile.
Enter the profile name, and set Radio Mode to BLE, the Radio will be Internal, and the BLE operation mode should be set to Both (Beaconing and scanning). Leave all other parameters as is. Save the profile.
Step 3:
By default the profile is disabled. Enable the profile by clicking the WiFi button on the right side.
Creating BLE Beacon Service Profile
Step 1:
Navigate to the Group where you want to have the BLE configurations enabled, then click on Devices. Click on the Configure icon on the top right-hand corner of the page, then click on Show Advanced.
Step 2:
Navigate to the IoT tab, and scroll down the page to see BLE Beacon Service Profiles. Click + to add a new profile.
Enter the profile name, the Radio will be Internal, and the Beacon Configuration Method should be set to IoT Operations App. Copy the Profile Identifier and save it somewhere. We will require it when configuring the IoT app.
Add Required Certificate for Beacon Management
The following certificate needs to be uploaded to HPE Aruba Networking Central for Beacon Management.
- Root CA: GTS Root R1
This certificate are available from https://pki.goog/repository/. Find the proper certificates, download the Certificate (PEM) format, and add it to your Certificates library in HPE Aruba Networking Central.
Go to >>Organization >> Certificates >> + to add your certificates. All certificate types are CA.
After the certificates are uploaded, they must be specified for usage in HPE Aruba Networking Central when the IoT profile authenticates with the Meridian Server.
Go to >> Group >> Config >> Security tab >> Certificate Usage >> IoT CA Cert select the certificates and save the setting.
Add Required Certificates for Asset Tracking
The following certificate needs to be uploaded to HPE Aruba Networking Centrall for Asset Tracking.
Meridian Asset Tracking requires DigiCert Global Root CA which can be downloaded from https://www.digicert.com/kb/digicert-root-certificates.htm
Go to >>Organization >> Certificates >> + to add your certificate. The certificate type is CA.
After the certificate is uploaded, it must be specified for usage in HPE Aruba Networking Central when the IoT profile authenticates with the Meridian Server.
Go to >> Group >> Config >> Security tab >> Certificate Usage >> IoT CA Cert select the certificate and save the setting.
Meridian App Configuration
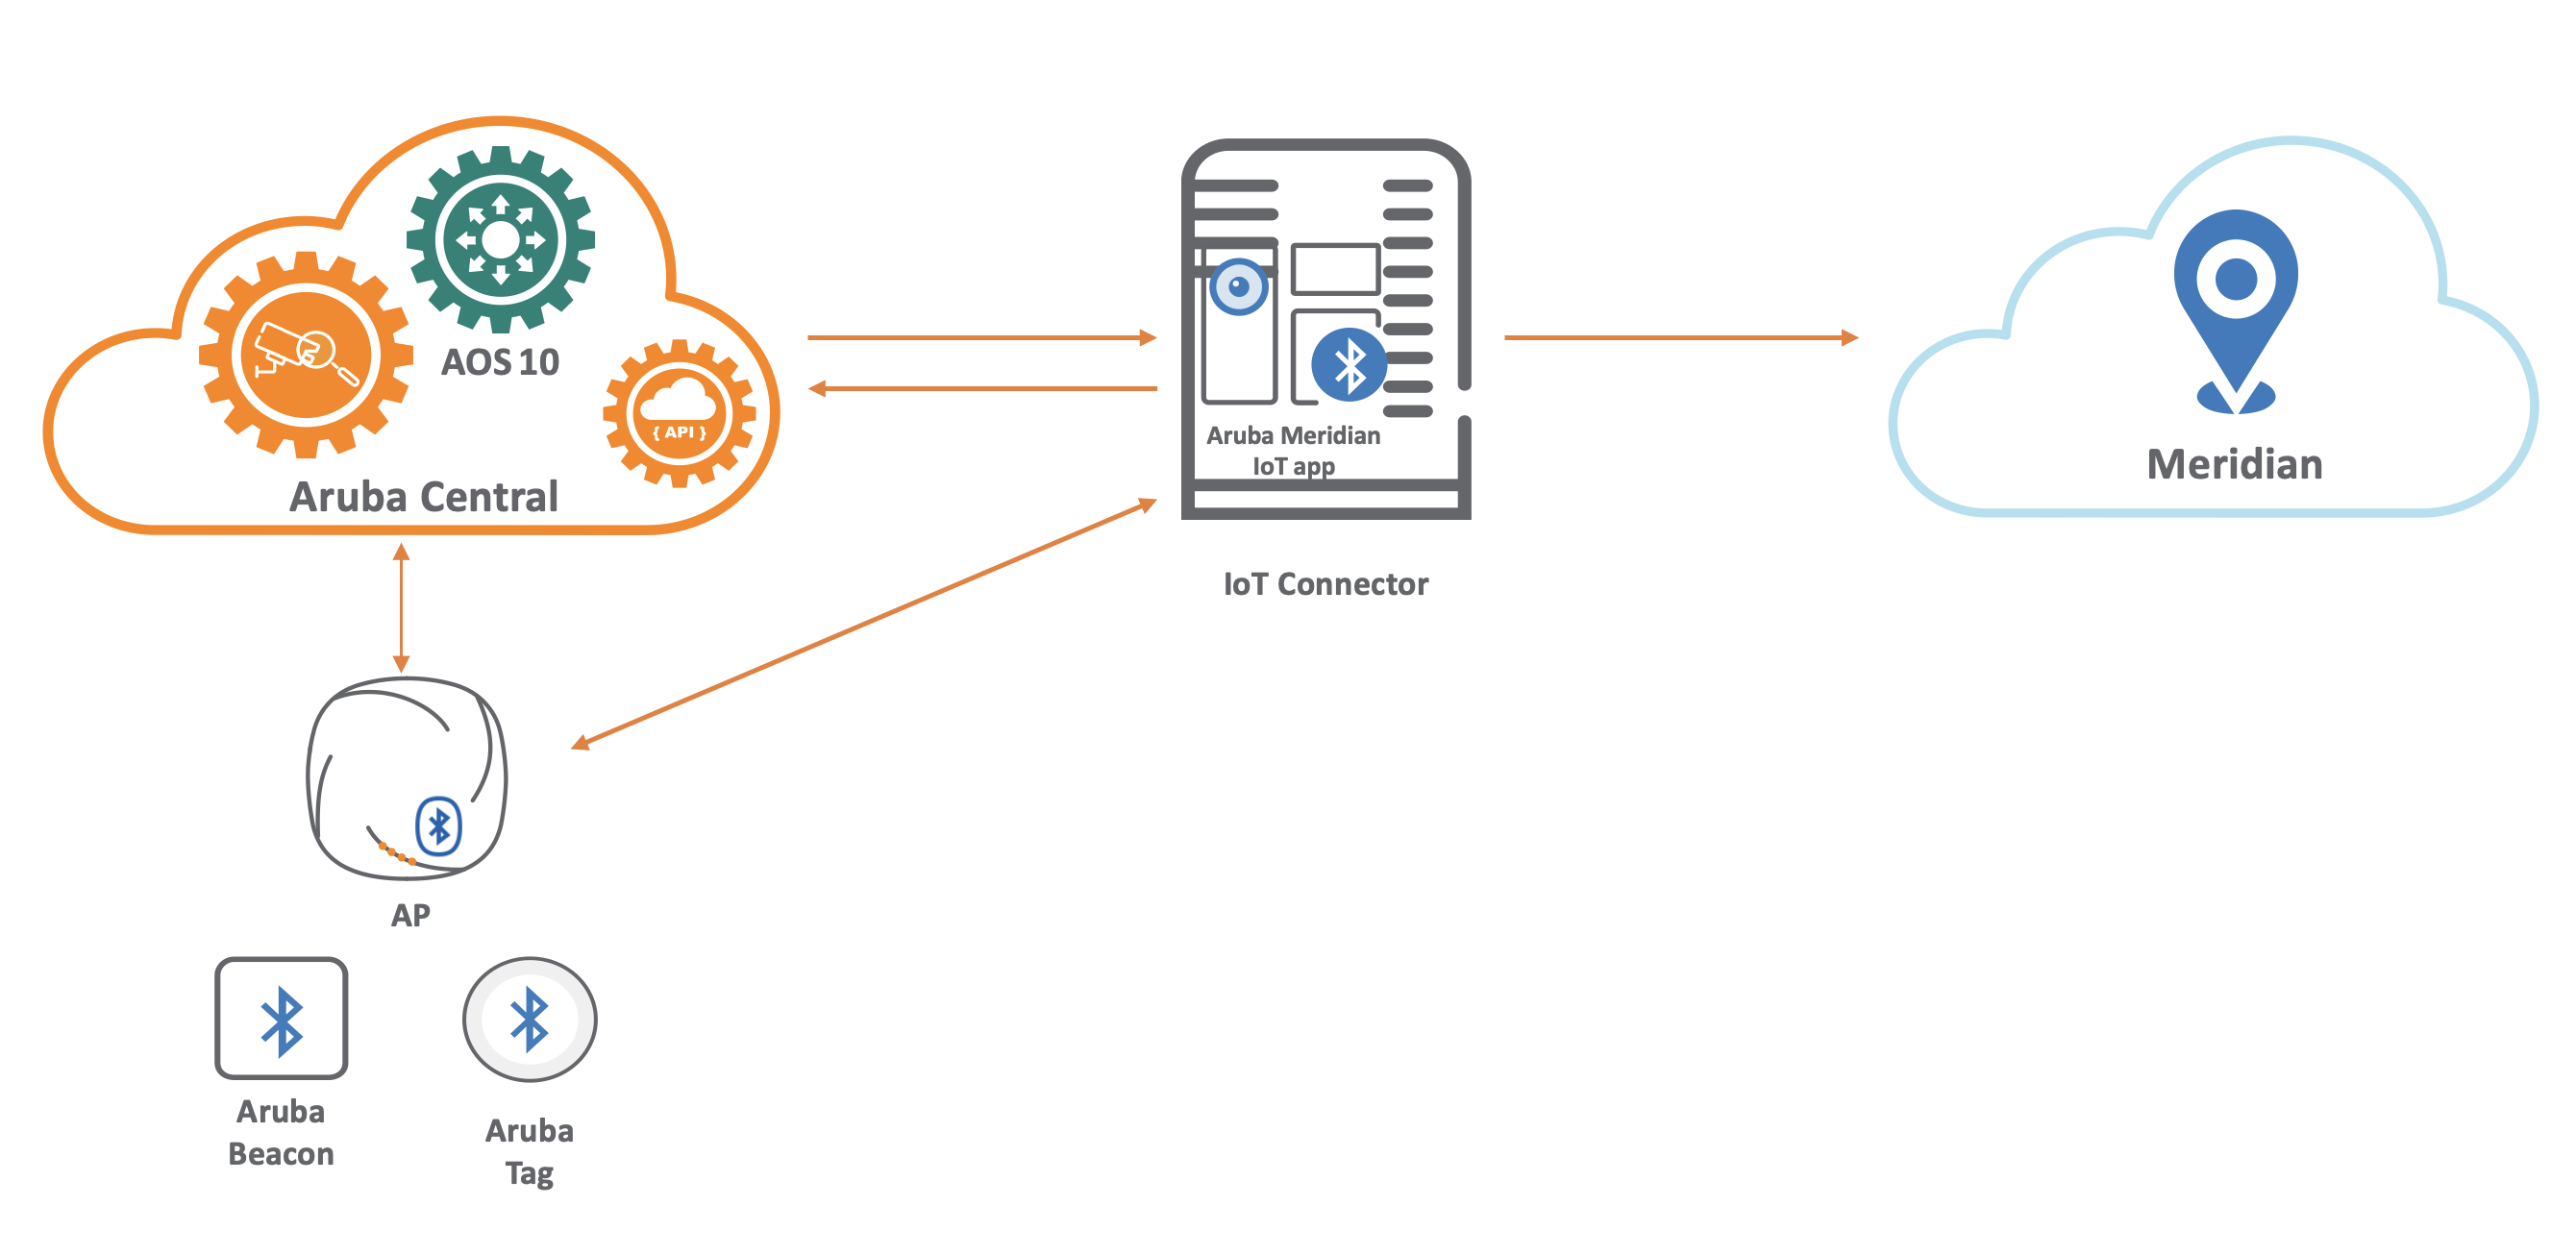
Before we configure the Meridian app on AOS 10, it is essential to set up an IoT Connector, which can be VM-based or AP-based. The IoT Connector plays a crucial role in aggregating device data, performing edge computation, and executing business logic on raw data before transmitting the dashboard metadata and IoT data to the Meridian app.
For customers with Firewalls please make sure to whitelist the following domains.
Here's a guide on how to set up the IoT Connector, which includes Installation, deployment, and HPE Aruba Networking Central IoT Connector configurations for VM-based or AP-based connectors - IoT Connector Installation
For AP-based IoT connectors, the only supported AP models are 6XX or 7XX and it is recommended you use AOS v10.7.2.2 or higher. Also, please ensure that APs are assigned to the group where you are installing the Meridian IoT App.
Ensure that you assign APs to the IoT Connector app. Assigning an AP to an IoT Connector allows an AP to send the collected data to an IoT Connector. To assign an AP to an IoT Connector, follow the Aruba documentation - Assigning APs to the IoT Connector
Note: This will not impact the network.
Once the IoT Connector is successfully deployed on the HPE Aruba Networking Central, follow the steps below to complete the Meridian App Configurations.
Step 1:
Navigate to the Global Level or specific group the IoT Connector is installed on, then click on Applications. Click on the IoT Operations icon on the top, then click on Connectors. Make sure to assign APs to the IoT Connector app.
Step 2:
Navigate to the Installed Applications, then click on Manage. Click on the app titled Meridian and then click on Install.
Step 3:
Under Required Variables, enter:
Access Token, which can be found in the Meridian Editor under Beacons > Beacons Management
Profile_ID, from BLE Beacon Service Profiles or while in the correct group goto devices > Config > Show Advanced > IoT > BLE Beacon Services Profile > Edit the specific profile
Transport_Interval is set to 5 seconds by default
Beacons_Management_Server_URL and Asset_Tracking_Server_URL are by default set to the standard server URL mentioned at the beginning of this document, and can be edited if it is an EU server.
-
Location_ID, found in Meridian Editor in Settings > Location
All other variables can be left as their defaults. Click Install. It takes a few seconds to install. Check under Status.
Step 4:
Wait for a few seconds to establish the connection to the Meridian Beacon management server. The Beacon Management connection status in Meridian Editor will update when a connection is made.
Summary
This configuration guide provides the fundamental components necessary to configure the infrastructure to enable the APB and communicate with Meridian Servers for Beacons Management and Asset Tracking. If the system does not work as expected after completing all the steps described above, you may contact https://asp.arubanetworks.com/
Contacting Support
Main Site - meridianapps.com
Meridian Support email - developers@meridianapps.com
Airheads Social Forum and Knowledge Base - community.arubanetworks.com
Comments
0 comments
Please sign in to leave a comment.